Introduction
You can automatically add new WordPress post to your Google Sheet. This can be a great way to keep track of your blog’s content, or to create a journal of your posts. To do this, you will need to set up an integration between WordPress and Google Sheets.
Workflow outline

- Log into your WordPress site, and go to FlowMattic dashboard.
- Click on the “New Workflow” button in the top.
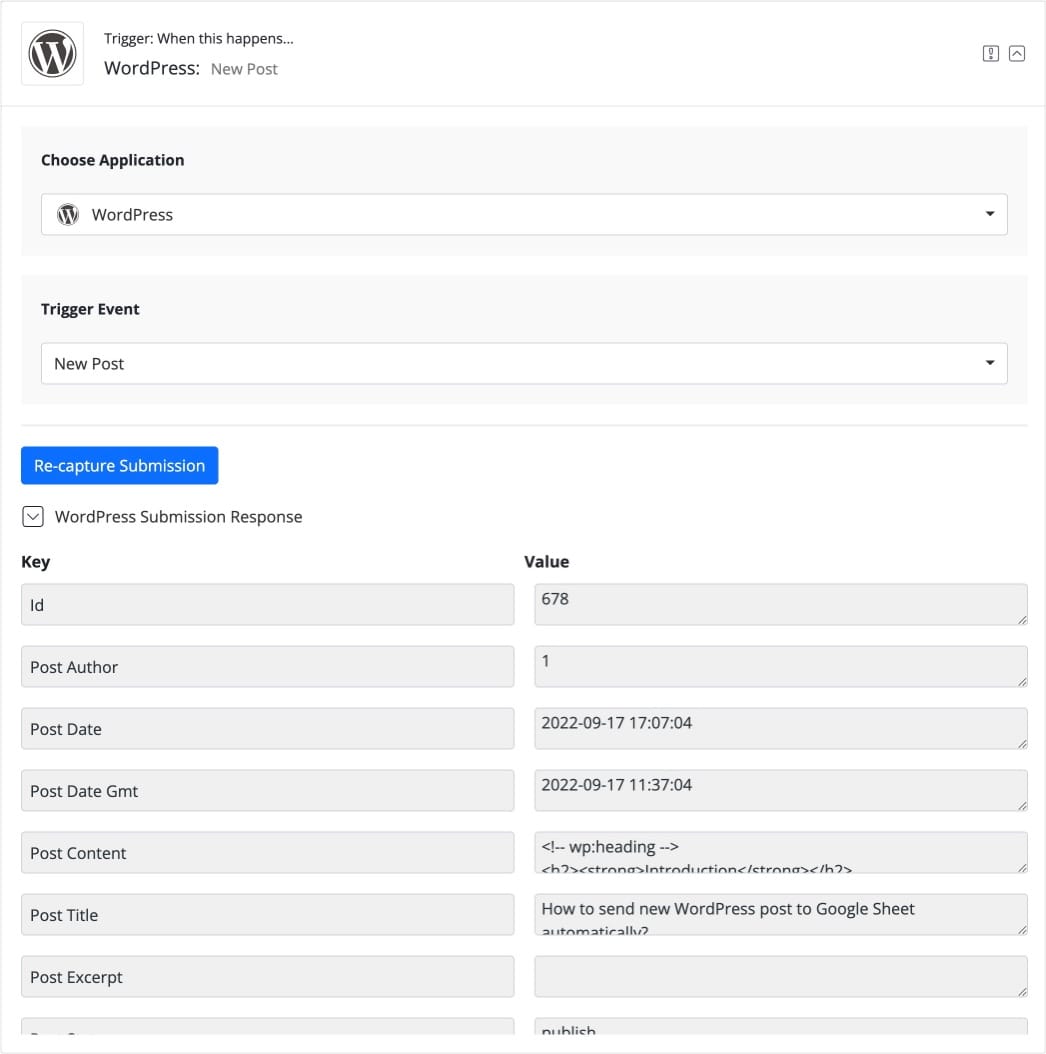
- Select WordPress as your Trigger App, and choose “New Post” as your trigger action.
- Click on “Capture Response” button and create a sample blog post.
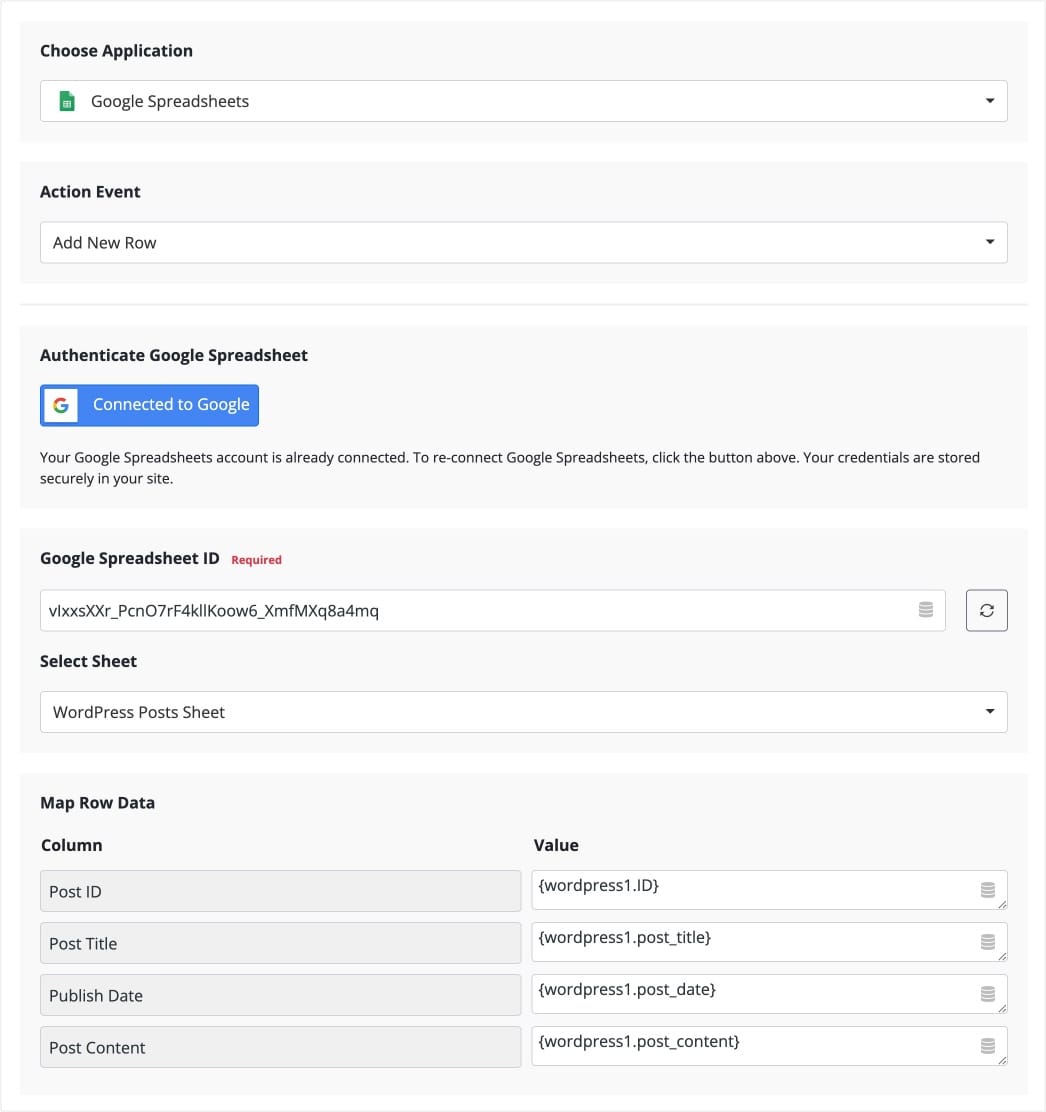
- Now, add a new action step in your workflow. Select Google Sheets as your Action App, then choose “Add New Row” as your action event.
- Connect your Google Sheets account to FlowMattic using the instructions provided.
- Select which Spreadsheet and Worksheet you want to add new row. Then, map the WordPress fields to the corresponding Google Sheet columns.
- Click on the “Save and Test Action” button at the bottom of the action step to test the integration. Then, set your workflow Live!
What you’ll need
In order to send a new WordPress post to a Google Sheet, you will need the following:
– A Google Sheet
– A WordPress site with the FlowMattic plugin installed
– The FlowMattic will need to be connected to your Google Sheet
Create a new Google Sheet
- Go to sheets.google.com.
- Click Blank in the Template Gallery.
- A new sheet will open up with the default columns- A,B,C etc and 1,2,3 as row numbers.
- Rename the sheet to “WordPress Posts” or anything you want by double-clicking on the name of the sheet at the top.
Once you’ve created your sheet, you’ll need to add the following columns to your sheet:
- post_title
- post_date
- post_content
You can add these columns by going to the sheet and entering the column names in the first row starting A1.Make sure you add the column headers in different columns, eg. A1, B1 and C1. Once you’ve added these columns, you’ll need to map your WordPress posts data with them.
Install the Google Spreadsheet integration
After you create a site in WordPress, the next thing you need to do is add content. One way to do this is to write posts and publish them on your site. But what if you want to send your new WordPress posts to a Google Sheet automatically?
Luckily, FlowMattic has an integration that lets you connect your site to a Google Sheet and automatically send new posts to the sheet.
Here’s how it works:
- When you install and activate FlowMattic, you’ll see a new admin menu under the FlowMattic admin menu called “Integrations”.
- Go to the Integrations admin menu, and search for Google Spreadsheet, when you see the sheets icon, click “Install” button to install the integration.
- Once the integration is active, use it in your workflow to connect to Google Sheets.
Creating your workflow
Let’s start creating your workflow. Follow these steps to create your workflow:
- Go to FlowMattic dashboard, and click “New Workflow” button. This will create a new workflow and redirect you to the workflow editor.
- When the workflow editor loads, choose “WordPress” as your trigger app, and choose “New Post” as your trigger event. This will trigger your workflow whenever a new post is published in your WordPress site.
- Now, click “Capture Response” button and create a sample blog post to get the post data, so you can map it with the action steps later.
- Next, click the plus icon at the bottom of your trigger step to add a new action step. Once the new action step is added, choose the Google Spreadsheet app as your action app, and choose “Add New Row” action event. This will allow you to send your WordPress post data to Google Sheet.

Set up your Google Sheet connection
In order to send your new WordPress post to a Google Sheet, you first need to set up a Google Sheet connection. A connection is a link between your WordPress site and a Google Sheet that contains your post data.
To set up the connection, you’ll need to follow the instructions in the workflow action step, while you are creating your workflow. When you add the Google Sheet action step, you will see the button to connect to your Google Account. Just click the button and authorize your account permissions. FlowMattic will then get the access token to your account and store it in your WordPress site database.
Once the connection is established, you can retrieve the sheets information. Select the spreadsheet you just created and then the sheet inside your spreadsheet to store the blog posts data.
After selecting the sheet, you will see your sheet columns appear under it, and you can map the data from your WordPress trigger. Click on the database icon next to the value column and select appropriate data from the trigger step. This will map your data to Google Sheet columns.

Next, click the button “Save and Test Action”. This will perform a live test and your posts will be added to your sheet!
Publish workflow
By default, the workflow is in draft mode, so it will not execute while you’re building your workflow. Once you are done with setting up your workflow, just click on the Draft button near the Save Workflow button to publish it. You will see the workflow is Live now. Click the Save workflow button once. You’re done!
Create a new WordPress post
WordPress is a great tool for managing a website or blog. We just set up an automation to send new posts to Google Sheets, which can be a handy way to keep track of your content.
Let’s make a test by creating a new post and see how it works. Go ahead and publish a new WordPress blog post. Any new posts you publish on your WordPress site will automatically be sent to your Google Sheet!
View your post in Google Sheet
When you log in to your Google Sheet and select your sheet you created above. You’ll see that the WordPress post you just published is there as a new row in your Google Sheet. Isn’t this amazing?
Conclusion
Overall, using Google Sheets to track your WordPress posts can be a helpful way to stay organized and keep track of your content strategy. By following the steps above, you can easily set up a system that will automatically send new WordPress posts to a Google Sheet for you.

